Home
Archive
Skyscapes
Available
In Progress
Biography
Statement
Photo Album
Essays
Click on the logo to visit the Take It Easel website:

Let me begin this page with expressing sincere appreciation and gratitude to Tobin, the maker of the Take It Easel. If you read his stories, you'll see that these easels were born from a recipe which includes: tradition, family love, and ingenuity. I'm so grateful for the design and craftsmanship and work that has gone into these, because of how much it has freed me to paint however and wherever I want. I "fine-tuned" mine a little over time, and while it was frightening at first to mess with such a good design, the comfort grew on me, as I could see my modifications were working out. I wanted to share them here, to encourage any other brave soul to consider them as well, or one or two of them, wherever any of your ideas overlap with mine.

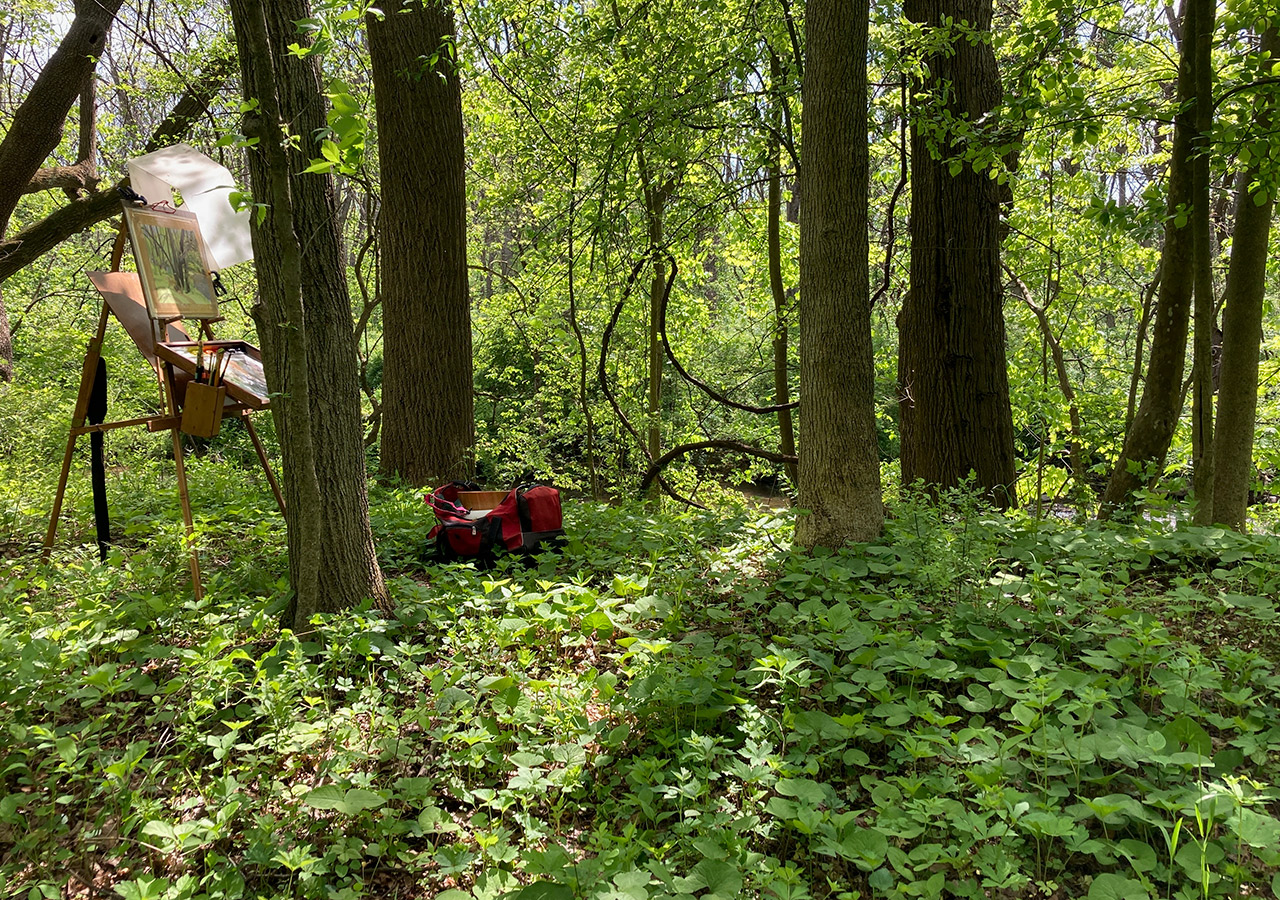
One of the strengths of the Take It is its wide footprint. It creates a very stable easel for any size of large painting, or the attachment of an umbrella, especially with breezes in mind. While I do paint out in the open some, like on those lovely beaches up north, or down south, I am most frequently painting with my muse, which is my stream. There are lots of tight spaces there, like the one in the picture above, so I wanted to reduce the footprint a little, and bring all the legs in. My solution was twofold: to shorten the cross-bar and the two palette support bars. While sawing these off was the part that took some courage, I had a feeling that Tobin would have sold me replacement pieces if it didn't work out : >) ... but it did work out.

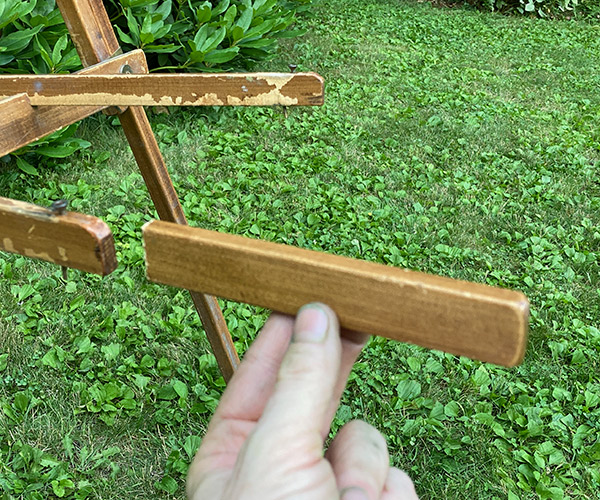
I removed 6 inches each from the two palette support bars. It requires also removing the pins on the bottom, drilling two holes, and tapping them into their new location.
I attached a cord to the bracket, so that the shorter bars can be humg from the hook in the conventional way. The hook needs to remain where it is so the back leg can slide all the way to the closed position, as well as one more position up, to sit at its most compressed position possible.
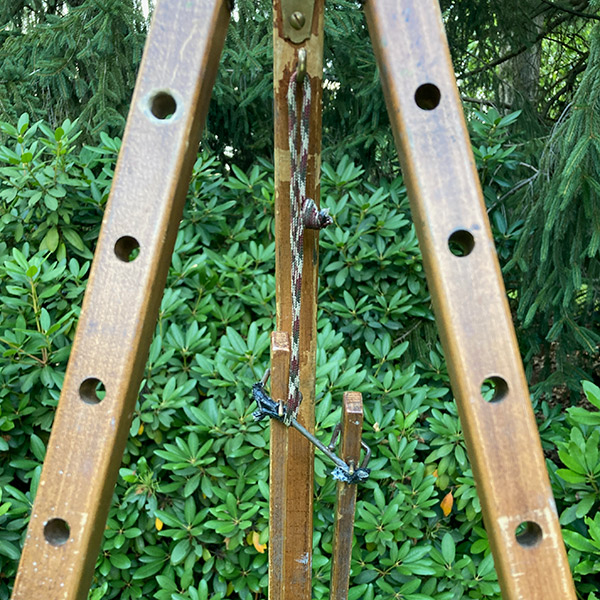
I removed about 5 inches from the crossbar. (Mosquito bite on the part of my hand without bugspray ... they are so sneaky!)
Notice the two screws that were added to the top ends of the palette support bars. They might look like a small thing, but they lead to a very big thing for me, which is the tipped palette.

I had previously been a pochade painter outside, and one of the things I liked about that concept is the ability to tip the palette to any angle for ease of seeing.  I found that the horizontal palette got too much reflected light from the sky for me to see my colors well, especially in the darks.  I live for color so I puzzled over this, and then the easy solution here came along.  By adding the two screws, and cord loops to my palette, the palette can then be tipped by leaning its back against the two front legs.  The angle can be adjusted by changing the distance from the back leg to those two front legs, and voila! 

Here are the loops attaching to the screws.
Here is the tipped palette ready to go.
If you wanted to do the same thing with a flat palette, here is my palette's lid resting on the screws, to simulate the same result.
I’m sorry to mention this, but the two screws that hold the shoulder strap on would rarely but occasionally loosen, and my easel would fall onto the path into the woods.  The house keys would always work to reattach the screw and get me back on my way, but I decided I wanted a more permanent attachment and a more luxurious strap, and this was my solution.  Here is the drilled hole to attach the top of the luxury strap.
Here is the drilled hole to attach the bottom of the luxury strap. It's drilled in this unexpected direction to allow for the leg-extender to attach without any interference.
I’m also sorry to say that I never did quite get the hang of the enclosing strap that holds everything together when it’s all folded up.  I tried replacing it with a Velcro strap, which I had thought at first might have been a moment of genius, until it also came apart a few times along that same path into the woods (Velcro weakens with use).  This solution is as straightforward as: one, two, tie your shoe, and for my personality works well.
I stained my Take It to a brown tone: “English Chestnut.”  I like that it helps the easel to blend into the landscape a little better, so I notice it less while I’m working.  Tobin wisely waxes them to protect and preserve the wood when they are made.  I tried removing the wax with denatured alcohol, but that winds up being only somewhat successful.  You've probably noticed in these photos that some of my refinishing has flaked off, ah well, it all just adds character : >)

I added numbers to the back leg holes.  I just remember the number that goes with each painting spot, and that speeds up my set up time when I come back to that same spot.

Here’s my little gizmo for small canvases. It's one of the always-packed items in my paint bag, and is 21 inches wide by 5 inches in height.

Here’s another gizmo that’s cut from translucent polypropylene corrugated board that folds up and goes into my bag.  This has worked well enough that I still don’t use an umbrella.  I may get an umbrella someday, but so far so good with this.  Many of my painting spots have limited possibilities for easel orientation, and that’s where this comes into play.  It’s worth mentioning that you do need the translucency.  Anything opaque over-shades the painting and makes it too difficult to see your color. Here it is in use:

You just need a matte knife and a metal ruler to make this, and you can always use paper or cardboard to experiment with different sizes. The dimensions of this board as a whole are 30 inches wide by 16 inches tall. The larger panel that does the shading on both sides is 14.75 inches wide by 9 inches tall.

You can notice that you do need to make two cuts in the back of the center, so that it can fold around both of the already folded halves. For the folds you simply cut the reverse side halfway through, then fold it along that line.

Here is the easel all folded up and ready to go.

I loved my Take It Easel from the very beginning, and my tinkering with it has only helped me to love it more. I hope you can tell. I like to joke that there is a piece of my brain dedicated to knowing where my beloved easel is at all times : >)  I had previously been a pochade painter, and originally bought my Take It thinking it might expand my painting possibilities outside.  It quickly became the only easel I use outside my studio for everything I paint. So thank you again Tobin, for keeping this terrific idea and design alive, and for making it so well.  It frees us to keep our minds on and in our paintings of any size, which is exactly where our minds want to be.

And I hope this is an encouragement to you, to consider getting one for yourself, or to customize yours to suit you as well as possible.  Happy painting.


  Home
Archive
Skyscapes
Available
In Progress
Biography
Statement
Photo Album
Essays